
Part VI Techniques and Tools
Chapter 24
Nigiri and Rolls
You put the sliced neta (topping) together with the shari (sushi rice), shape it into nigiri, and wrap rolls in nori. This is the last step in making sushi. In this chapter, you will learn three things, each with the reason behind it. You will learn the shape of a nigiri that comes apart in the mouth. You will learn why chefs keep their hand movements to a minimum. And you will learn how to make gunkan and rolls.
In this chapter you will learn
- To explain the "firm outside, soft inside" shape of the rice ball, and why it comes apart in the mouth
- To explain the three reasons for keeping hand movements to a minimum
- To make gunkan and rolls hygienically, with the nori and the makisu facing the right way
- To explain, from how rice grains stick together, what causes over-pressed nigiri and nigiri that falls apart (Grade 1)
- To plan the shape, the wasabi, the nikiri, and the serving order to suit each topping and each guest (Grade 1)
24.1 The Purpose of Nigiri and the Shape of the Rice Ball
The purpose of nigiri is to make the neta and the shari come apart in the mouth at the same time. If the shari disappears first, only the neta is left in the mouth. If the neta disappears first, you end up chewing plain rice. When the two break down at the same speed, the body-temperature shari melts the fat in the neta. The acid of the vinegared rice brings out the umami. The two become a single flavor and go down together.
This sense of unity depends on several things. These are the shape and amount of the rice ball, the pressure of your hands, the thickness of the neta (Chapter 23), and the temperature (Chapter 9).
Firm Outside, Soft Inside: Press the Outside, Not the Inside
A good rice ball has a shape called firm outside, soft inside (gaiko-nainan). The outside is firm, and the inside is soft. The grains on the outside stick lightly to one another and form a thin wall. That is why the nigiri does not fall apart when you pick it up with chopsticks or dip it in soy sauce. The grains on the inside are not pressed together. They hold air in the spaces between them.
When you put the nigiri in your mouth and press it with your tongue, the outer wall breaks. The layer of air inside collapses, and the grains separate one by one and fall loosely apart. This is the ideal texture. The word nigiri comes from a verb that means "to squeeze," but in truth you firm up only the outside and leave the inside unpressed. This is the essence of nigiri.
If you press too hard, you push the air out of the inside. The grains stick tightly together and form a dumpling. It does not come apart in the mouth. You end up chewing a lump, and the neta disappears first. On the other hand, if you do not press enough, the outer wall does not form. The nigiri falls apart as soon as it is lifted or dipped in soy sauce.
The Amount of Shari
The amount of shari in one piece generally falls in the range of 10 to 20 g. Traditional Edomae nigiri and omakase (chef's choice) restaurants that serve many courses use smaller amounts, 10 to 13 g. Conveyor-belt sushi and takeout use larger amounts, 16 to 20 g.
The standard for deciding the amount is balance with the neta. You get a sense of unity when the neta and the shari weigh about the same, or the neta is a little heavier. For example, if the neta weighs 15 g, use 12 to 15 g of shari.
Adjusting the Amount to the Topping
Even within the same balance, you add or take away a little shari depending on the nature of the neta. For rich, fatty neta, use a little more shari, so that the fat coats the rice. For hikarimono (silver-skinned fish) cured in vinegar, use less shari, because the acid of the vinegared rice and the acid of the cure add up. For neta that takes many chews, such as shellfish and squid, use a little more shari, so that the rice and the neta are finished at the same time.
You decide the amount of shari after you have cut the neta.
Tuna, and especially toro (fatty tuna), goes well with shari at body temperature, about 35 to 37°C. Tuna fat is said to melt completely at around 24 to 30°C. However, this varies with the cut and the individual fish. With cold shari, the fat does not melt in the mouth and stays like wax. Body-temperature shari melts the fat, so you taste the fat as umami (Chapter 14).
24.2 Tegaeshi and the Number of Hand Movements
Tegaeshi (hand-turning sequence) is the series of hand movements on the left hand, from bringing the neta and shari together to turning the piece over and finishing its shape. This description is for a right-handed chef. The steps and the number of movements differ by school. There are three main types of tegaeshi: hon-tegaeshi, kote-gaeshi, and tate-gaeshi.
| Tegaeshi | Typical number of movements | Features |
|---|---|---|
| Hon-tegaeshi | 5–6 movements | All six sides are shaped, giving the most beautiful form. Takes a long time to master |
| Kote-gaeshi | 3–4 movements | Fast, with natural movements. Used by the most chefs today |
| Tate-gaeshi | 4–5 movements | The shari acts as a base, so large or soft neta does not fall apart |
Hon-tegaeshi is the old Edomae method, with 5 to 6 movements. Kote-gaeshi takes 3 to 4 movements and is the most widely used. Tate-gaeshi takes 4 to 5 movements and suits large neta.
Three Reasons to Use Fewer Movements
Whatever the method, chefs try to reduce the number of movements, that is, the number of times they move their hands. There are three reasons.
The first is body heat. Human body temperature is about 36°C. Even the surface of the palm is around 30°C, which is higher than the temperature at which the fat in the neta starts to melt. The longer the neta stays in your hands, the more fat melts out of its surface, and the gloss disappears. The fat makes the neta slip on the shari, and the freshness drops. This is most noticeable with toro, but white-fleshed fish also loses its firm bite when its surface warms up.
The second is the temperature of the shari. The shari is set at body temperature, 35 to 37°C. The longer it stays in your hands, the more the heat of your hands and the room pulls it away from the target temperature.
The third is hygiene. The more often your hands touch the food, the more chances there are for bacteria to pass from your hands. Tezu (vinegared hand water, Chapter 6) helps. Even so, reducing the number of movements is the surest way.
Finer Differences Between the Methods
In hon-tegaeshi, you place the shari on the neta in your left hand and press it with your left thumb to settle it. Next, you turn both hands over at the same time to move the sushi onto the fingers of your right hand, then cover it with your left hand and take it back. You roll it over on your left hand so the neta is on top, and firm up both sides. Because each of the six sides is shaped once, the form is the most beautiful, and the neta and shari stick together well. On the other hand, it takes many movements, and the sushi stays in your hands longer.
Kote-gaeshi is a simplified form in which you turn the sushi over by rolling it sideways in your left hand. It is fast, with natural movements. Yokote-gaeshi, in which you roll it sideways with your right hand alongside, and the method of turning it with the left hand alone using its weight and momentum, are variations of kote-gaeshi. You choose among them depending on the size and shape of the neta.
Tate-gaeshi is also written with the character for "vertical." You place the neta at the base of the fingers of your left hand, put the shari on it, and shape it. Then you turn it over as if covering it with your left hand. The shari becomes a base that supports the neta, so large or soft neta does not fall apart.
| Tegaeshi | Advantages | Disadvantages | Suitable neta |
|---|---|---|---|
| Hon-tegaeshi | All six sides are shaped, giving the most beautiful form. Good contact between neta and shari | The sushi stays in the hands a long time. Hard to master | Hikarimono such as kohada and horse mackerel, white-fleshed fish, and neta of irregular shape |
| Kote-gaeshi | Fast. Natural movements. Less body heat passes to the sushi | The sides tend to be less neatly shaped | Flat, stable neta in general, such as tuna, squid, and octopus |
| Yokote-gaeshi and others | Variations of kote-gaeshi. Easy to adapt to the shape of the neta | If the turn is unsteady, the shapes are uneven | Neta of different sizes |
| Tate-gaeshi | The shari acts as a base, so the neta does not fall apart. Looks good | Hard neta does not easily become one with the shari | Large neta, soft neta, simmered anago, and uni |
Cooling your hands serves the same purpose as using fewer movements. Many chefs dip their fingertips in ice water to lower the temperature of their hands before shaping fatty neta. They use cold water for the tezu and change it during service.
24.3 Steps for Shaping Nigiri
Let us look at the flow of shaping nigiri, using kote-gaeshi as the example.
- Tezu Dip your fingertips in the tezu and spread it thinly over your palms. Your palms should just glisten. If they are too wet, the shari absorbs the water and falls apart.
- Take the shari Take enough for one piece and gather it lightly into a barrel shape in your hand. Do not press it yet.
- Neta and wasabi Place the neta at the base of the fingers of your left hand, with the side that will face up placed face down. Put wasabi in the center.
- Place the shari Put the shari on the neta and press the middle lightly with your thumb to make a small hollow. This lets out the air between them, and the neta and shari stick together.
- Turn and shape Roll the sushi in your hand so the neta is on top. Lightly firm up both sides and the front and back ends, then stroke the top of the neta so it sticks closely. Turn the sushi around and shape the other side in the same way.
You put the wasabi between the neta and the shari to seal in its aroma and heat. Wasabi also helps keep bacteria from multiplying. However, this is only a supporting effect. It does not replace handwashing and temperature control (Chapter 21).
In practice, accuracy comes before speed. First learn to shape each piece with the same amount, the same shape, and the same pressure every time. Speed comes later, as you repeat accurate work. If you try to use fewer movements and your shapes become uneven, you have lost sight of the purpose.
Once shaped, the nigiri should ideally be in the guest's mouth within 10 seconds. This is because the body-temperature shari starts to cool, the neta warms up, and the nori grows damp.
The Roles of the Left and Right Hands
The left hand is the base. It holds the sushi, rolls it, and sets the standard for its shape. The right hand does the adjusting. It takes the rice, applies the wasabi, and presses. Only the fingertips of the right hand apply force. The left hand only cups the sushi.
When shaping, first use the thumb and index finger of your right hand to firm up both sides, that is, the long edges. Next, press lightly on the short edges at the front and back. Finally, stroke the top of the neta lightly with your index finger so it sticks closely. Turn the sushi half a turn and shape the other side with the same number of movements.
24.4 Shape, Amount of Wasabi, and Nikiri
The Three Shapes of Nigiri
Nigiri falls into three main shapes. Tawara (barrel) shape has rounded sides and bulges like a straw rice bale. It feels soft in the mouth and forms naturally with kote-gaeshi. Funagata (boat) shape has a flat bottom and narrows toward the top. The neta looks as if it is riding in a boat, and its curve shows beautifully. Hakogata (box) shape is an angular shape with the sides pressed straight. It forms when you shape all six sides with hon-tegaeshi or tate-gaeshi, and the pieces look even when lined up.
Whatever the shape, keep the bottom flat. The basic rule is to let each end of the neta extend 2 to 3 mm beyond each end of the shari, so that the neta covers the shari and hides it. If the ends of the neta are even with the shari, or the shari sticks out, the nigiri looks poor.
The Amount of Wasabi
The amount of wasabi depends on the fat and thickness of the neta. Use a little more for fatty toro and for strong-smelling hikarimono. Use less for mild white-fleshed fish, and for squid, shellfish, and ama-ebi (sweet shrimp), which are eaten for their sweetness. Many restaurants use none for simmered anago (conger eel) or tamagoyaki (Japanese omelet). As a guide, use from the size of two or three rice grains up to the size of one azuki bean. An amount that hides the flavor of the neta is too much.
Bacteria multiply most easily where the neta meets the shari. When wasabi is placed between them, its pungent compound, allyl isothiocyanate, has a supporting effect right at this boundary. However, the effect from the amount in one piece is only supportive. It does not replace temperature control and handwashing.
Nikiri, and Salt with Citrus
Nikiri (simmered soy glaze), covered in Chapter 20, is brushed thinly onto the surface of the neta, just once. The surface should just shine. If it drips and soaks into the shari, it is too much. Guests can eat nigiri brushed with nikiri as it is, without dipping it in soy sauce.
Some white-fleshed fish, squid, shellfish, kuruma prawn, ama-ebi, and similar neta are sometimes served with salt and citrus instead of nikiri. The citrus may be sudachi, kabosu, lemon, or a similar fruit. The delicate umami and sweetness that soy sauce would hide stand out through contrast with the salt (Chapter 15). Sprinkle a very small pinch of salt with your fingertips, and squeeze one or two drops of citrus juice.
24.5 Gunkan and Rolls
Gunkan
Gunkan (battleship roll) is a nigiri with a strip of nori wrapped around the rice ball and the neta placed on top. It is used for neta that does not hold a shape, such as ikura (salmon roe), uni (sea urchin), and negitoro (minced fatty tuna with green onion). Cut the nori into strips 3 to 3.5 cm wide. As a guide, cut a full sheet of nori into six. Wrap it with the rough side facing in, that is, toward the shari, and fix the end with a single grain of rice.
Nori absorbs moisture from the shari and starts to get damp right away. That is why you put the neta on as soon as you wrap the gunkan, and serve it right away. Gunkan made in advance has limp nori that is hard to bite through, and the aroma of the sea is lost. The same goes for temaki (hand rolls). The crispness of the nori is everything. Hand it to the guest right after you roll it.
Which Way the Makisu and the Nori Face
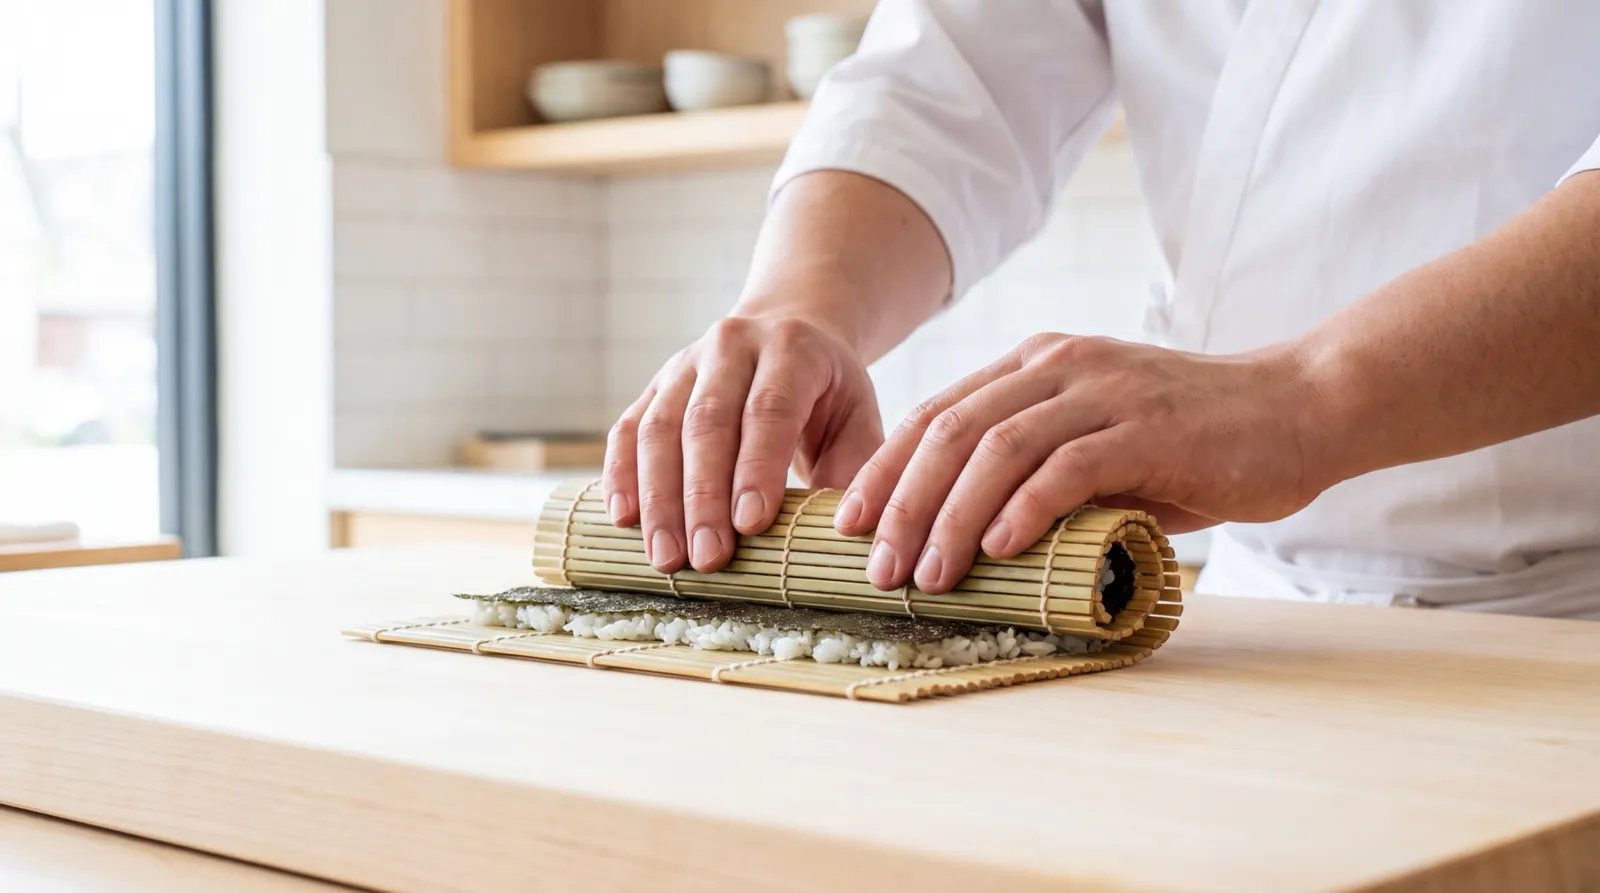
A makisu (bamboo rolling mat) is a tool made of thin bamboo strips woven together with string. The side with the bamboo skin is flat and smooth, and the other side is rounded. Use it with the flat, smooth side up. Place the knots of the string at the far side, away from you. That way, the knots do not get in the way at the end of rolling.
Nori also has a front and a back. The glossy, smooth side is the front, and the rough side is the back. In rolls, put the back toward the shari, that is, on the inside. The usual explanation is that the rough side grips the moisture and stickiness of the shari, holds the grains in place, and keeps the roll from falling apart. Because it holds like an anchor, this is called the anchor effect. The glossy front faces out, so the roll also looks better. If you place the nori the wrong way, the shari slips on the smooth side and the filling shifts. When you cut the roll, the nori and the shari separate (Chapter 21).
As for nori size, a full sheet, about 21 by 19 cm, makes one futomaki. A full sheet cut in half along the long side is a half sheet (hansetsu), which makes one hosomaki. Take the nori out of its bag just before use and toast it lightly to bring out its aroma (Chapter 21). Do not leave it sitting in a damp place.
Hosomaki, Futomaki, and Uramaki
Hosomaki (thin roll) is the basic roll, with a single filling rolled in a half sheet of nori. Typical examples are tekka (tuna), kappa (cucumber), kanpyo (dried gourd strips), and shinko (pickles such as takuan, pickled daikon).
- Lay out the nori Place the nori back side up, lined up with the near edge of the makisu.
- Spread the shari Spread about 80 g of shari from the near side, leaving a margin of 1.5 to 2 cm at the far edge. Do not press the shari down. Spread it as if you were laying the grains in place.
- Place the filling Place the filling in a straight line, slightly closer to you than the center. If the roll uses wasabi, spread it under the filling.
- Roll in one motion Lift the near edge of the makisu and hold the filling down with your fingers. Roll in one motion, aiming to land the near edge of the nori on the far edge of the shari.
- Firm it up Press lightly over the makisu to firm up the roll and shape it.
If you press the shari down, the grains are crushed and form a dumpling. The nori also absorbs moisture from the shari, goes limp, and loses its crispness.
A roll with several fillings in a full sheet of nori is futomaki (thick roll). A roll with the shari on the outside is uramaki (inside-out roll). In uramaki, the shari sticks to the makisu, so wrap the makisu in plastic wrap before use.
How to Roll Futomaki and Uramaki
Fillings for futomaki include tamagoyaki, kanpyo, shiitake, oboro (sweet fish or shrimp floss), cucumber, and anago. Use 180 to 220 g of shari, and leave a margin of 3 to 4 cm at the far edge. Place heavy fillings on the near side and fillings that break easily on the far side. Make one full turn with the near fillings as the core, then wrap a second layer with the rest of the nori. Firm up the whole roll with the makisu, and neaten the filling and shari that stick out at both ends.
For uramaki, spread shari over the whole sheet of nori, turn it over, and roll it with the shari on the outside. The California roll, which was created outside Japan, is the best-known example (Chapter 25). Because the nori is on the inside, its crispness is lost. To make up for the texture, coat the outer shari with sesame seeds or tobiko (flying fish roe).
Rolling Pressure and Clean Cuts
Use as little rolling pressure as possible, within the range where "the nori does not crack and the filling does not shift." If you roll too hard, the grains are crushed into a dumpling and the nori tears. If you roll too gently, the roll falls apart when cut. When you firm up the finished roll, do not press down from above. Instead, pull the near and far edges of the makisu gently against each other to shape all four sides. The end of the nori sticks naturally to the moisture of the shari. There is no need to wet it.
To cut a hosomaki, first cut it in half. Then line up the two halves and cut them into three equal parts, giving six pieces. Use a yanagiba (slicing knife) or another thin, very sharp knife. Let the weight of the blade cut the nori, then draw the knife all the way down in a single pull cut (Chapter 23). If you push, the nori tears, the shari is crushed, and the cut surface is ruined. If the cut surface is crushed, the cause is one of three things. The blade is dull, the blade is not wet, or you are pushing.
| Roll | Nori | Shari | Margin at far edge | Number of pieces | Key points |
|---|---|---|---|---|---|
| Hosomaki | Half sheet (back side in) | About 80 g | 1.5–2 cm | 6 | One filling. Do not press the shari down |
| Futomaki | Full sheet (back side in) | 180–220 g | 3–4 cm | 8 | Heavy fillings near, fragile fillings far. Make the core with one full turn |
| Uramaki | Full or half sheet (nori on the inside) | 120–150 g | None | 6–8 | Wrap the makisu in plastic wrap. Add texture with sesame seeds or similar |
| Gunkan | Strip 3–3.5 cm wide (a full sheet cut into 6 as a guide) | 12–15 g | None | None | Serve right after wrapping |
| Temaki | A quarter to a half of a full sheet | 20–30 g | None | None | Hand it over right after rolling |
Cutting Rolls and Keeping Rolls Hygienic
Cut rolls right after rolling them. The basic rule is six pieces for hosomaki and eight for futomaki. Wipe the blade with a damp cloth after each cut to remove the bits of shari and nori stuck to it. Then cut with a pull cut.
For hygiene with rolls, pay attention to the hands that touch the nori. Nori is a dry ingredient. If you touch it with wet hands, it gets damp and tears, and bacteria pass to it along with the moisture from your hands. Take the nori out of its bag with dry hands, place it on the makisu, and only then use tezu.
Rice grains left in the gaps of the makisu become food for bacteria. During service, wipe it with a cloth after every roll. After service, rinse off the rice grains with lukewarm water, scrub out the gaps with a brush, and let it dry completely. If grains are left, the makisu becomes a home for mold and bacteria.
Do not roll many hosomaki at once, cut them, and leave them sitting. The reason is the same as the rule against slicing toppings in advance (Chapter 5). Rolls, too, are rolled for each order, cut as soon as they are rolled, and served as soon as they are cut.
24.6 Serving: Order, Speed, and Placement
Speed
As you learned, the ideal is for nigiri to reach the guest's mouth within 10 seconds of shaping (24.3). As time passes, the shari cools, the neta warms up, and the nikiri soaks into the shari. The differences in temperature and texture that the chef planned are lost.
So the chef watches how fast the guest eats. The chef starts shaping the next piece a little before the guest swallows the previous one. If the guest is deep in conversation, the chef waits before shaping. For two guests dining together, the chef also adjusts the pace so they finish each piece at the same time.
Order
The basic order of nigiri is from mild flavors to strong ones. Start with mild white-fleshed fish or shellfish. Then move on to akami (lean tuna), hikarimono, fatty toro or aburi (searing with a flame) pieces, and simmered anago. Finish with something sweet, such as tamagoyaki or a kanpyo roll. Place hikarimono cured in vinegar at a point where the palate needs refreshing. Place fatty pieces in the middle to later part of the meal.
Alternating textures keeps the guest from getting bored, for example shellfish after white-fleshed fish, or squid after akami. However, this is only a general rule, and you change it while watching the guest. For guests who are drinking, serve the neta that comes with salt and citrus earlier. For children, serve tamagoyaki early. For guests who do not like fat, slice the toro thinly. You will learn about planning omakase and customer service in Chapter 26.
Placement and Guidance on Soy Sauce
Place the nigiri directly in front of the guest, within easy reach. Not in front of the chef. Set it slightly toward the guest from the center of the geta (wooden serving board) or plate. Turn it so the neta is on top and the long sides run left and right. In this position, when the guest picks it up with the right hand, it naturally turns toward the soy sauce dish. Set the bottom of the nigiri on a dry surface, never on a wet plate. This lets the guest pick it up with chopsticks or by hand.
At restaurants that serve nigiri brushed with nikiri, add a word such as "Please enjoy it as it is." At restaurants where guests dip in soy sauce, be ready to explain how if asked. Dip only the edge of the neta lightly in soy sauce. If you dip the shari in soy sauce, it falls apart and soaks up too much. Guests from outside Japan tend to dip the shari side. Some restaurants serve the first piece brushed with nikiri to show how to eat it.
24.7 Common Mistakes, How to Fix Them, and How to Practice
To fix a mistake, trace it from the visible symptom back to its cause in the shaping.
- The shari falls apart
- The outer wall has not formed. The cause is one of four things. The pressing is too weak. There was too much tezu, and the shari absorbed the water. The shari has cooled and retrograded, so the grains do not stick. Or the shari has dried out and lost its gelatinized surface layer. To fix this, add one firm pressing of both sides. Use less tezu, and review the temperature and dryness of the shari (Chapter 9).
- The neta falls off
- The neta and shari are not sticking together. The cause is one of these: there is no thumb hollow, the surface of the neta is wet, or hard neta has no hidden scoring. The shari may also be too round, so the contact area is small. Wipe the moisture off the neta and let the air out with the hollow. Make hidden scoring in hard neta (Chapter 23), and finish by lightly stroking the top of the neta.
- The shari becomes a hard dumpling
- It has been pressed too much. Either the force is too strong, or there are so many movements that force is applied too long, or you are already pressing when you take the shari. When taking the shari, just "set" it, and press only for an instant at the finish. In practice, check every piece. Lift the rice ball with chopsticks to see that it does not fall apart, and press it with your tongue to see that the grains separate one by one.
- The shapes are uneven
- The amount of shari or the place where you press changes each time. For the amount, take the shari 10 times, weigh it, and repeat until the difference is within 1 g. For the pressing position, always touch the same spot with your right thumb and index finger. Turn the sushi around and press the other side the same number of times.
- Too much wasabi
- The flavor of the neta is lost, and the heat goes up the nose. Use a smaller area of your finger to pick up the wasabi, and put it on the center of the neta as a single dot. For neta with little fat, use half as much. Always follow a guest's order for sabinuki (without wasabi). If you make a mistake, shape the piece again.
Begin practice with shari alone. Make 100 pieces a day. Gather the same amount into a barrel shape each time, firm up both sides, and flatten the bottom. Line them all up and check whether their height and width are even. Next, learn the turning movements using a thin board or a scrap of cloth as a stand-in for the neta. Finally, shape nigiri with real neta.
For practice, too, use only body-temperature shari, and throw it away when it cools. Cold shari changes the feel of shaping. It also helps to count your movements on video. If you are using more than 6 movements, find which ones are unnecessary and cut them one at a time.
Chapter summary
- The purpose of nigiri is to make the neta and shari come apart in the mouth at the same time. Make the rice ball firm outside and soft inside: press only the outside, briefly, and leave air inside.
- The amount of shari is in the range of 10 to 20 g, decided by balance with the neta. You use fewer movements for the sake of body heat, the temperature of the shari, and hygiene. Once shaped, nigiri should reach the guest's mouth within 10 seconds.
- Put the wasabi between the neta and the shari. Its effect against bacteria is only supportive and does not replace handwashing and temperature control.
- For gunkan and rolls, put the rough back of the nori toward the shari, and use the makisu with the flat side up. Handle nori with dry hands. Cut rolls as soon as they are rolled, and serve them right away. Wipe the blade with a damp cloth after each cut.
- Gelatinized starch on the surface of rice grains sticks where grains are pressed into wide contact. Only the outside becomes a wall. The stronger and longer the force, the more the rice firms up to the center and becomes a dumpling. Cold shari retrogrades and falls apart easily. (Grade 1)
- Nigiri comes in tawara, funagata, and hakogata shapes, and the neta extends 2 to 3 mm beyond the shari at each end. The order goes from mild to rich and ends with something sweet, changing as you watch the guest. (Grade 1)
- Fix mistakes by tracing them to their cause in the shaping. Falling apart means the wall. Neta falling off means contact. A dumpling means force and time. Uneven shapes mean the amount and the pressing position. (Grade 1)
Review questions
Q1 Which of the following is a correct reason for keeping the number of hand movements in shaping nigiri as small as possible?
a The more movements, the more air gets into the shari, and the nigiri falls apart more easily
b The heat of the hands melts the fat in the neta, the shari moves away from its target temperature, and there are more chances for bacteria to pass from the hands
c Tezu kills bacteria, so there is no hygiene problem, but the nigiri looks worse
d With fewer movements, you can press the shari firmly all the way to the center
e Body heat does not pass to the neta; the reason is to avoid keeping the guest waiting
Answer: b
Body temperature is about 36°C, and even the surface of the palm is around 30°C. The longer the sushi stays in the hands, the more the fat in the neta melts, and the shari moves away from its body-temperature setting. The more often the hands touch the food, the more chances there are for bacteria to pass from them. Option a is backwards: the more movements, the more the inside is pressed and the rice becomes a dumpling. In option c, tezu does not kill bacteria. It is a supporting measure that makes them slower to multiply. Option d, "pressing firmly all the way to the center," goes against the "firm outside, soft inside" rule.
Q2 Which of the following is correct about handling the nori and the makisu for rolls?
a Put the glossy front of the nori toward the shari, and use the makisu with the rounded side up
b Put the rough back of the nori toward the shari, and use the makisu with the flat, smooth side up
c Nori handled with wet hands tears less easily, and no bacteria pass to it
d For hosomaki, press the shari firmly onto the nori as you spread it
e Rolling and cutting rolls in bulk before service is hygienic and lets you serve them right away
Answer: b
The usual explanation is that when the rough back of the nori faces the shari, it grips the shari and keeps the roll from falling apart. The glossy front faces out, so the roll also looks better. Use the makisu with the flat, smooth side up and the knots at the far side. In option c, wet hands make the nori damp so it tears, and they also pass bacteria to it. If you press the shari down as in option d, the grains are crushed and the nori goes limp. Option e is the same as slicing in advance. Roll and cut for each order, and serve right away.
Q3 Which of the following correctly describes how a "firm outside, soft inside" rice ball is formed?
a If you press the whole ball evenly and firmly, the grains stick together all the way to the center, and the nigiri comes apart easily in the mouth
b Gelatinized starch on the surface of the grains sticks where grains are pressed into wide contact. Only the outside, where the force reaches, becomes a wall. The inner grains touch only at points, so air remains
c If you press the outside loosely and the inside firmly, the outside comes apart the moment it enters the mouth, giving a good texture
d If you chill the shari in the refrigerator, the grains stick together more easily and do not fall apart
e The longer you take to shape the nigiri, the more the surface starch blends in, and the easier it comes apart
Answer: b
The wider the contact area, the more strongly the layers of gelatinized starch stick together. That is why only the outside, where force is applied, becomes a wall, and air remains inside. Option a produces a dumpling. Option c reverses the shape and does not work. Option d is wrong: in cold shari, starch retrogradation makes the grains hard, so they stick poorly and fall apart easily. Option e is also wrong: the longer the force is applied, the more the rice sticks together to the center and becomes a dumpling.